Comment installer Active Directory dans Windows Server 2019
Dans ce TuTo, je vous montre comment installer votre premier contrôleur de domaine (DC) Windows Server 2019 Active Directory (AD). Nous utiliserons le Gestionnaire de serveur pour installer et configurer AD, vous devrez donc exécuter une version de Windows Server 2019 qui inclut le rôle de serveur Desktop Experience. Vous pouvez également configurer AD dans Windows Server 2019 Server Core à l'aide du Gestionnaire de serveur exécuté sur un périphérique distant.
To complete the instructions below, you will need to have an account with administrator privileges in Windows Server 2019.
Configurer une adresse IP statique
Avant de configurer AD sur votre serveur, vous devez vous assurer que l'adaptateur réseau du serveur a été affecté à une adresse IP statique valide sur votre réseau local.
Connectez-vous à Windows Server 2019 avec un compte administrateur local.
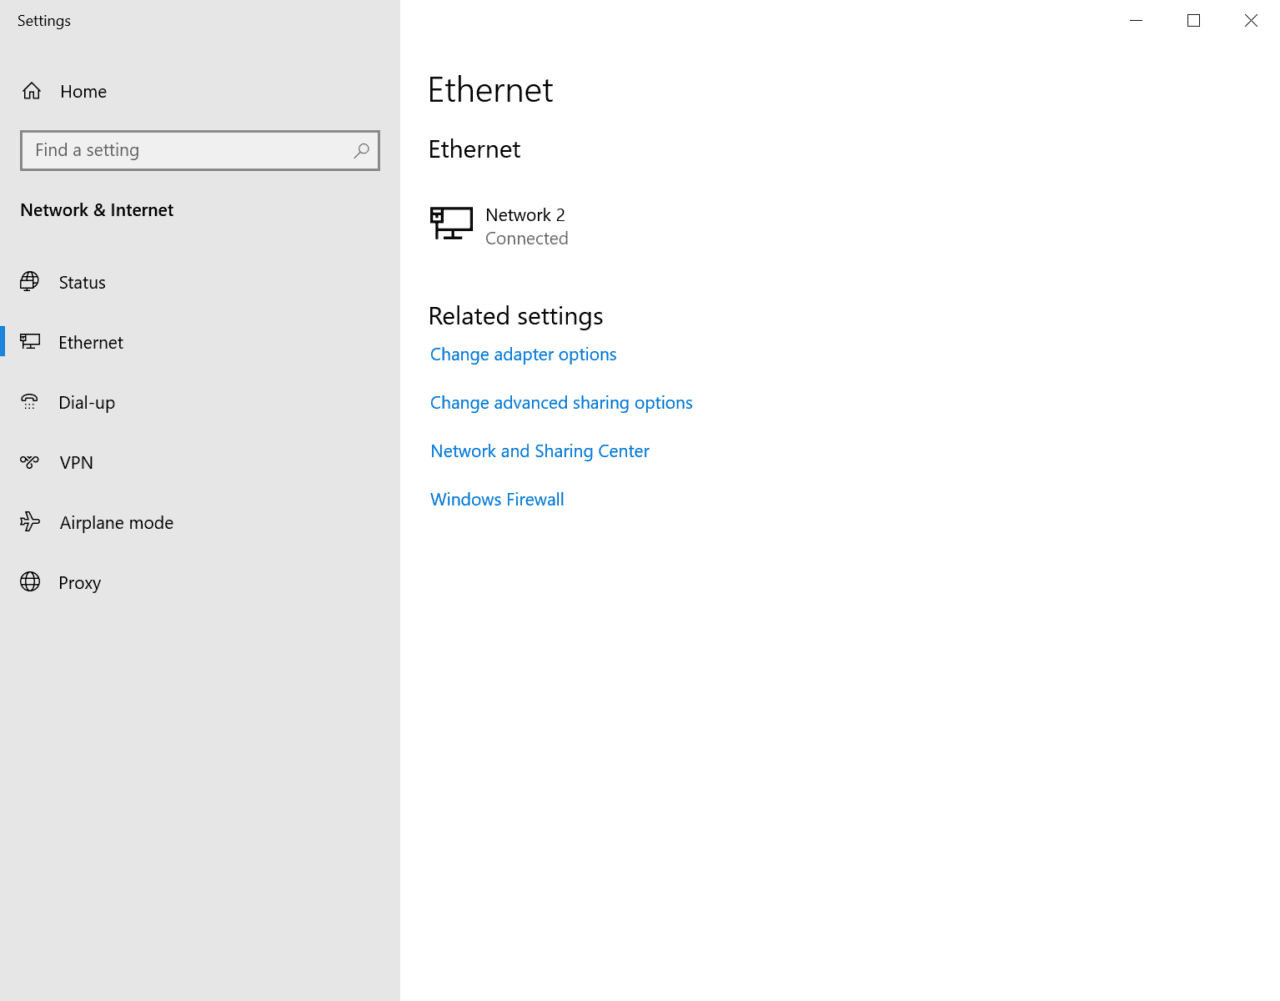
Cliquez avec le bouton droit sur l'icône réseau dans la barre d'état système en bas à droite de la barre des tâches et cliquez sur "Ouvrir les paramètres réseau et Internet".
Dans le volet de gauche de l'application Paramètres, cliquez sur "Ethernet" sous Réseau et Internet.
Dans le volet de droite sous "Paramètres associés", cliquez sur "Modifier les options d'adaptateur".
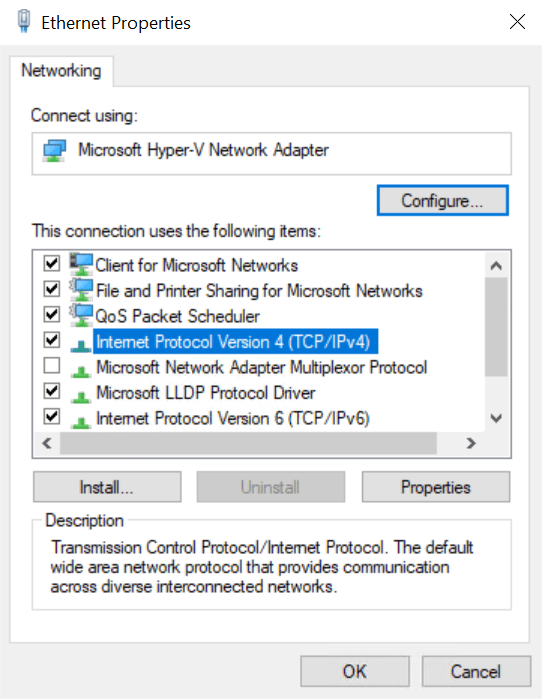
Dans la fenêtre "Connexions réseau", cliquez avec le bouton droit sur l'adaptateur réseau de votre serveur et sélectionnez "Propriétés" dans le menu.

- In the Ethernet Properties dialog, click Internet Protocol Version 4 (TCP/IPv4), and then click Properties.
Comment installer Active Directory dans Windows Server 2019.
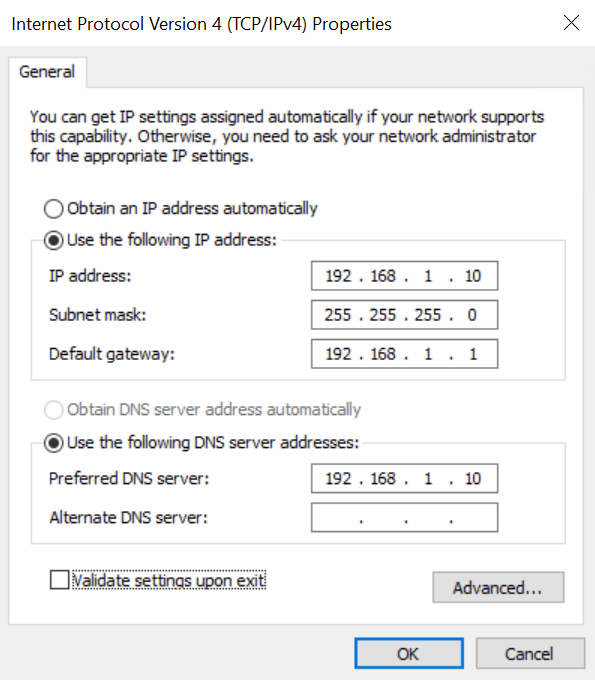
Dans la boîte de dialogue "Propriétés du protocole Internet version 4 (TCP/IPv4)", cochez "Utiliser l'adresse IP suivante". Vous devrez remplir les trois champs suivants : adresse IP, masque de sous-réseau, passerelle par défaut.
Votre contrôleur de domaine devra communiquer avec d'autres périphériques sur le réseau local, il est donc important de parler à la personne responsable de votre réseau et de lui demander de vous fournir une adresse IP statique qui n'est pas déjà utilisée. Sur mon réseau, j'attribue une adresse IP statique de 192.168.1.10, un masque de sous-réseau de 255.255.255.0 et la passerelle par défaut est 192.168.1.1.
Comment installer Active Directory dans Windows Server 2019.
Cochez "Utiliser les adresses de serveur DNS suivantes". Définissez le serveur DNS préféré sur la même adresse IP que celle que vous avez attribuée à Windows Server. Ainsi, dans mon exemple, j'utiliserai 192.168.1.10. Cliquez sur "OK" lorsque vous avez terminé.
Le premier contrôleur de domaine de votre domaine sera également un serveur DNS. L'assistant de configuration des services de domaine Active Directory configurera automatiquement un serveur DNS pour vous.
Fermez la boîte de dialogue "Propriétés Ethernet", la fenêtre "Connexions réseau" et l'application Paramètres.
Nommez votre serveur
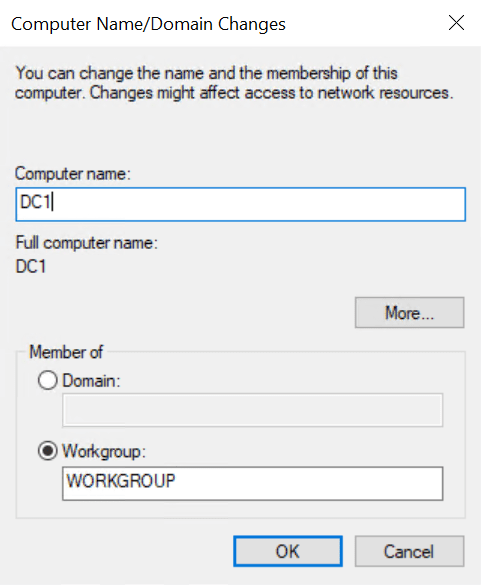
Assurez-vous d'attribuer un nom à votre serveur qui reflète son nouveau rôle. Quelque chose comme DC1 pourrait être bien.
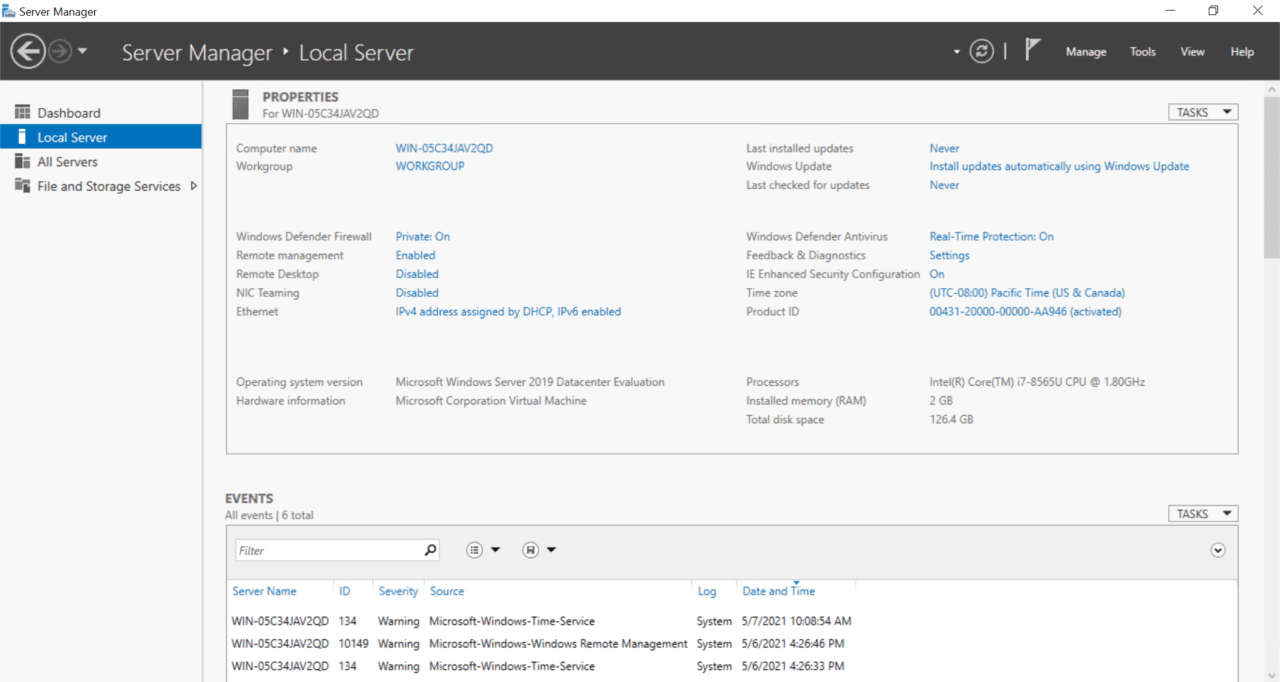
Dans le Gestionnaire de serveur, cliquez sur "Serveur local" dans le volet de gauche. Dans la section "Propriétés" à droite, cliquez sur le nom de l'ordinateur de votre serveur à droite du "Nom de l'ordinateur".
Installer le rôle Active Directory Domain Services
Commençons par l'installation et la configuration de AD.
Connectez-vous à Windows Server 2019 avec un compte administrateur local.
Server Manager devrait s'ouvrir par défaut. Si ce n'est pas le cas, cliquez sur le menu Démarrer et recherchez Server Manager dans la liste des applications installées, puis cliquez dessus.
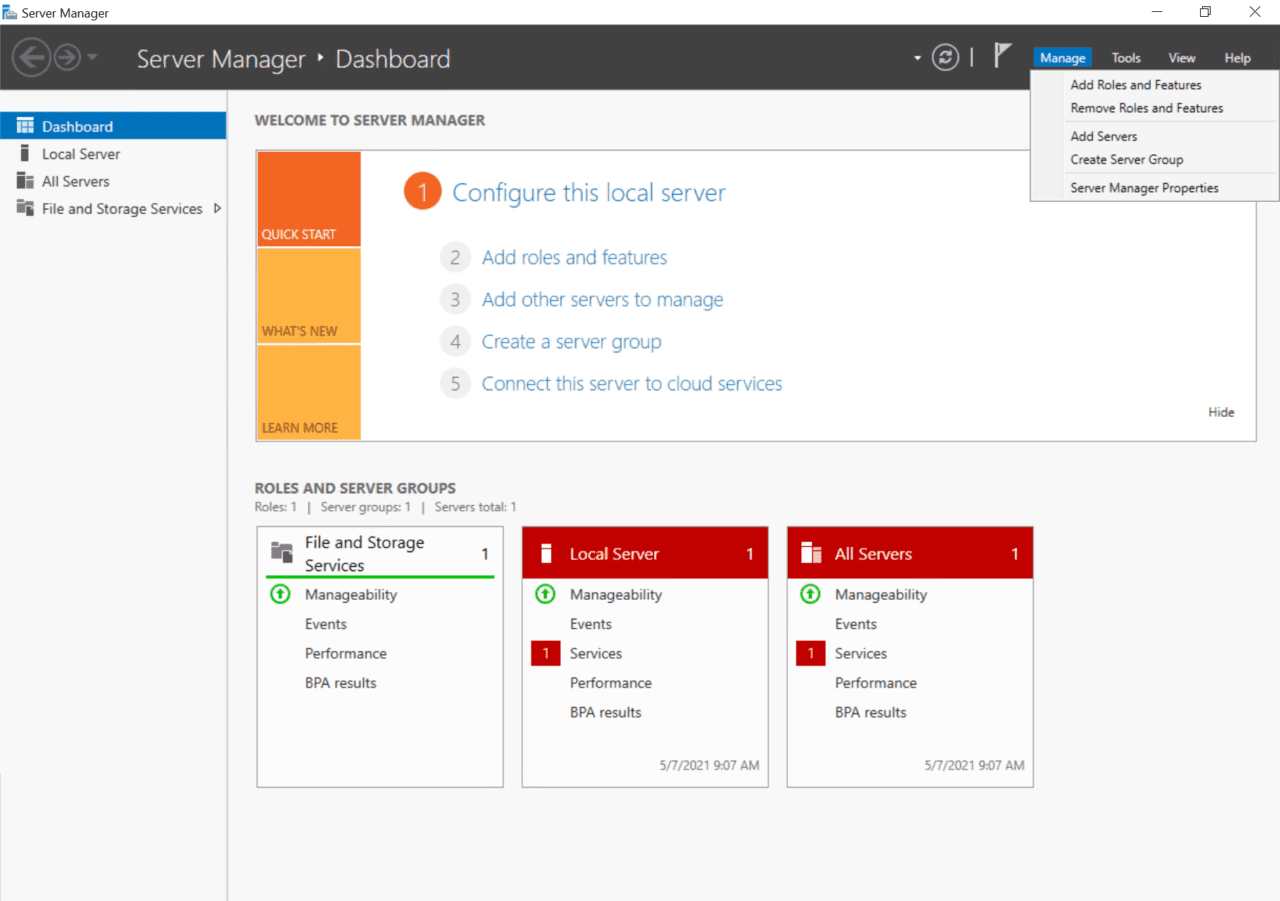
Dans Server Manager, cliquez sur le menu Gérer dans le coin supérieur droit, puis sélectionnez Ajouter des rôles et des fonctionnalités dans le menu.
- In the Add Roles and Features Wizard, click Next on the Before You Begin screen.
- On the Installation Type screen, make sure that Role-based or feature-based installation is selected and click Next.
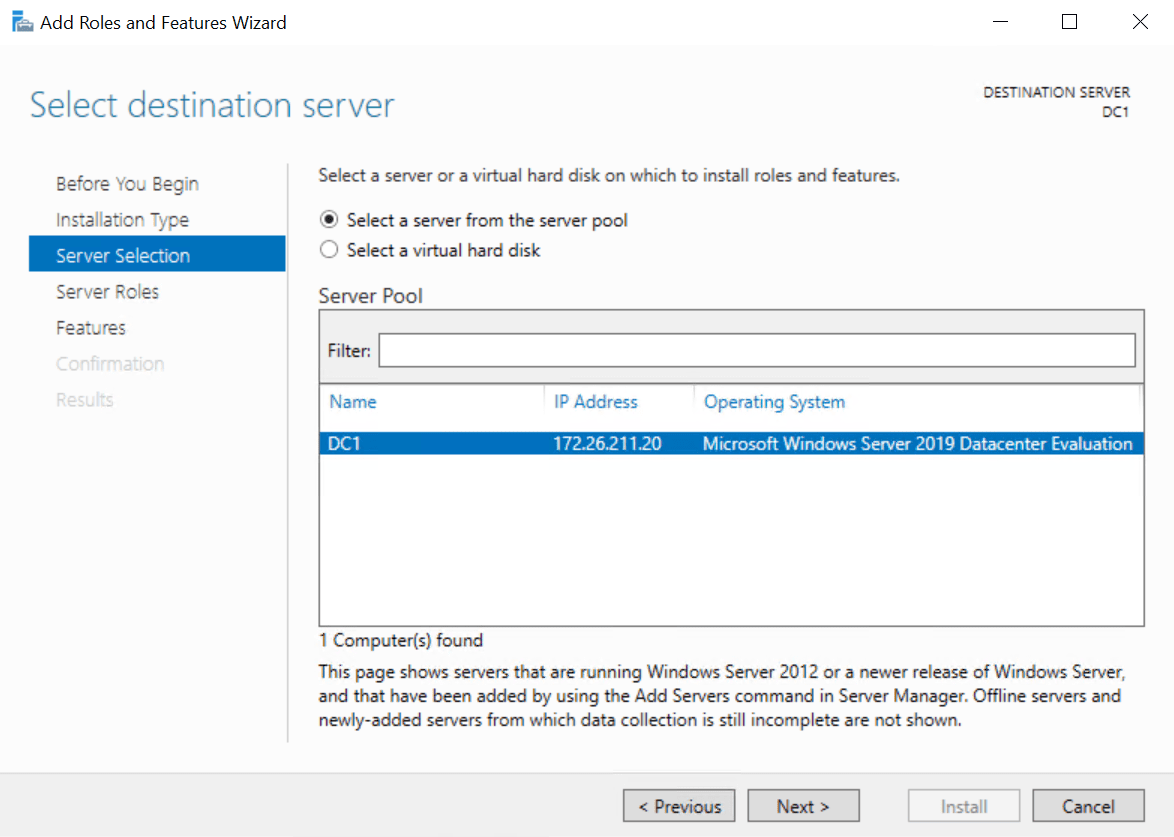
- On the Server Selection screen, make sure that your Windows Server is selected in the list and click Next.
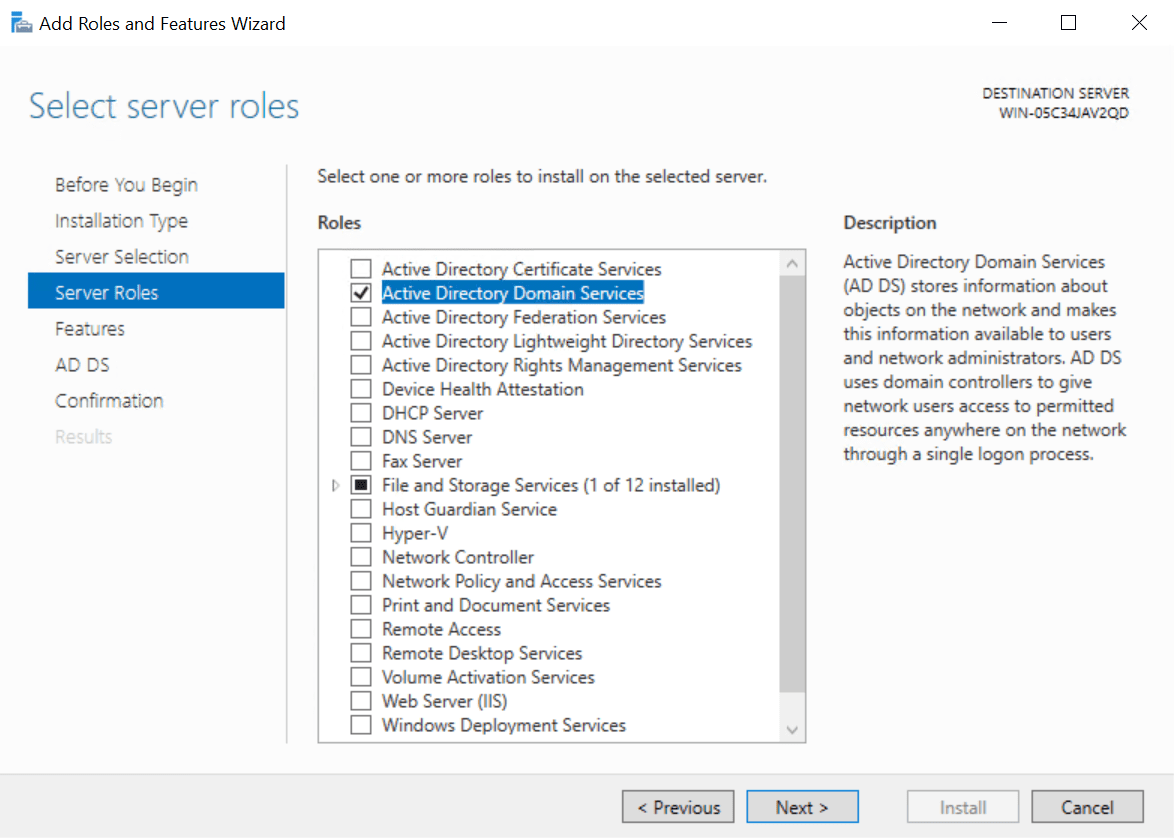
- On the Server Roles screen, check Active Directory Domain Services in the list of roles.
- In the Add Roles and Features Wizard popup dialog, make sure that Include management tools (if applicable) is checked and then click Add Features.
- Click Next on the Server Roles screen to continue.
- Click Next on the Features screen.
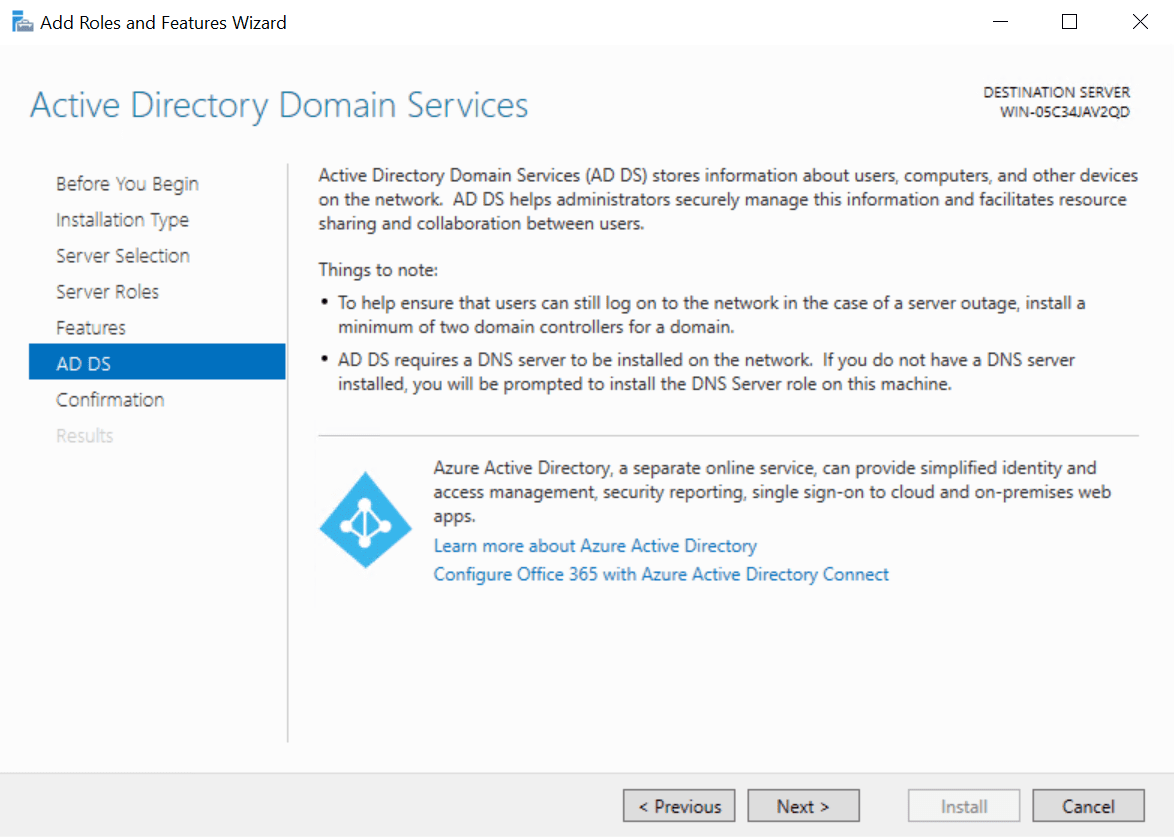
- Read the information on the AD DS screen and click Next.
- Now click Install on the Confirmation screen.
- When the installation is complete, click Close in the Add Roles and Features Wizard.
Configure Active Directory in Windows Server 2019
Now that the AD DS role is installed in Windows Server 2019, you can configure your first AD domain controller. Let’s go back to Server Manager and start the configuration.
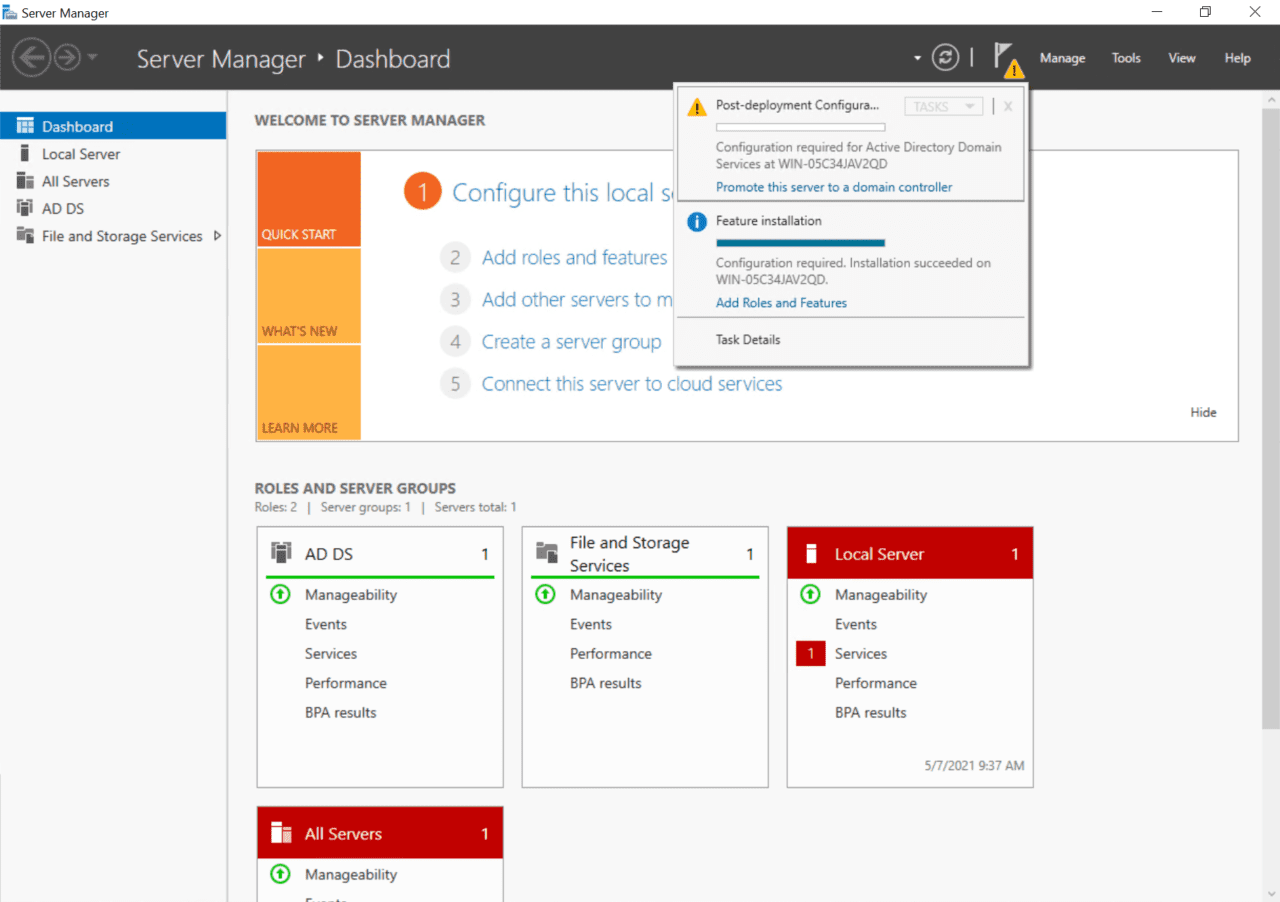
- Back in Server Manager, you should see a yellow exclamation mark by the notifications flag in the top-right corner. Click it and then click Promote this server to a domain controller.
- In the Active Directory Domain Services Configuration Wizard dialog, check Add a new forest under Select the deployment operation.
- In the Root domain name box, type the Fully Qualified Domain Name (FQDN) for your new AD forest. I’m going to use contoso.com for my AD domain name. Click Next to continue.
You should make sure that you own the public top-level domain name (TLD). In this example, I should own the contoso.com domain name. AD in the FQDN defines my internal DNS namespace for Active Directory.

- On the Domain Controller Options screen, type and confirm a Directory Services Restore Mode (DSRM) password. You will need this if you want to restore AD from backup. Click Next to continue.
- On the DNS Options screen, you can safely ignore the delegation warning and click Next.
- On the Additional Options screen, click Next to accept the assigned NetBIOS name.
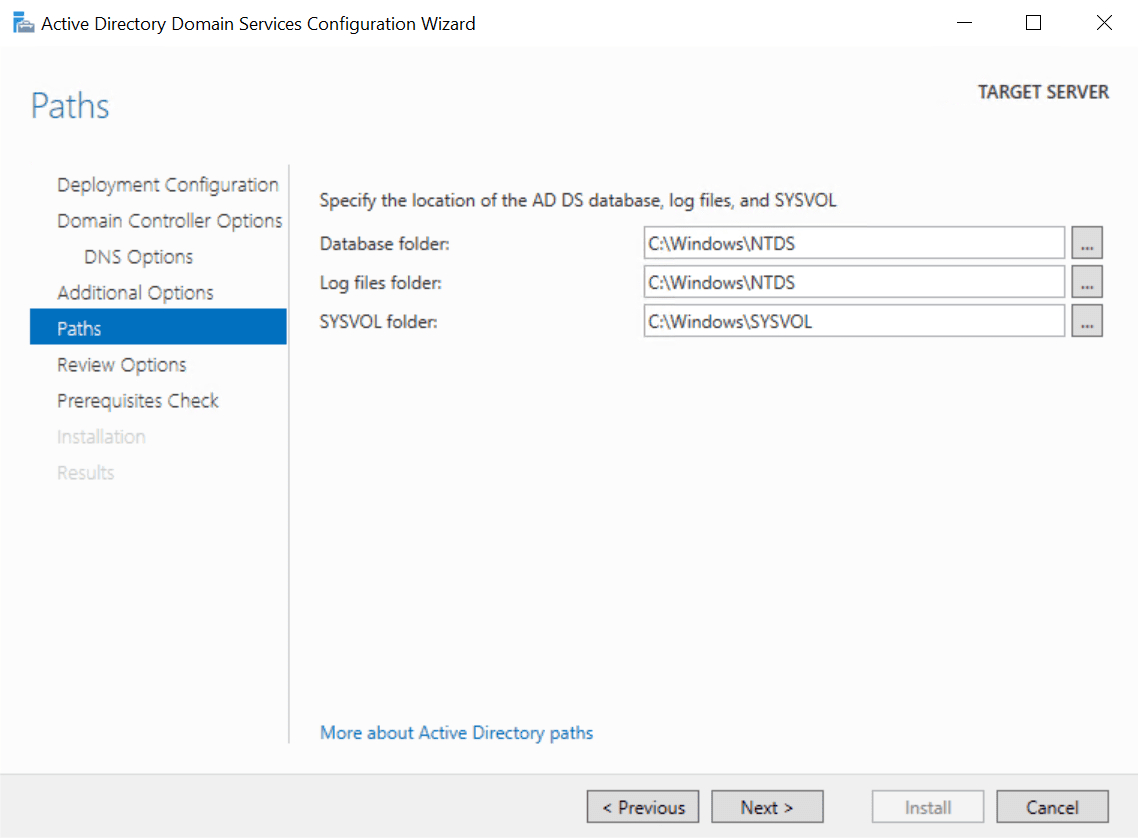
- Click Next again on the Paths screen to accept the default database, log files, and SYSVOL folder locations.
- Now click Next on the Review Options screen.
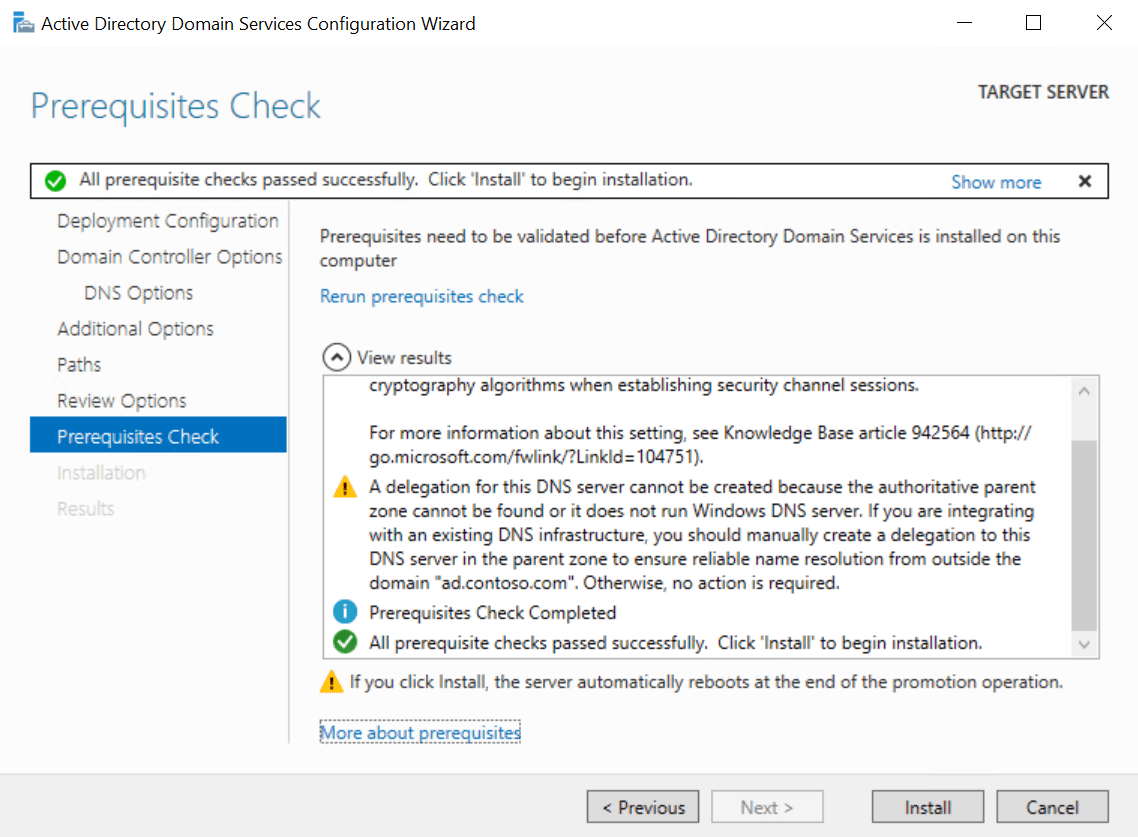
The wizard will run some prerequisite checks to make sure AD can be installed on the server. Hopefully your server will pass the checks and you can continue installing AD. It’s normal to get a few warnings as you can see in the image below. You will not be able to proceed with the install if the server fails the prerequisite checks.
- Now click Install to configure AD on the server. The server will automatically reboot to complete the install process.
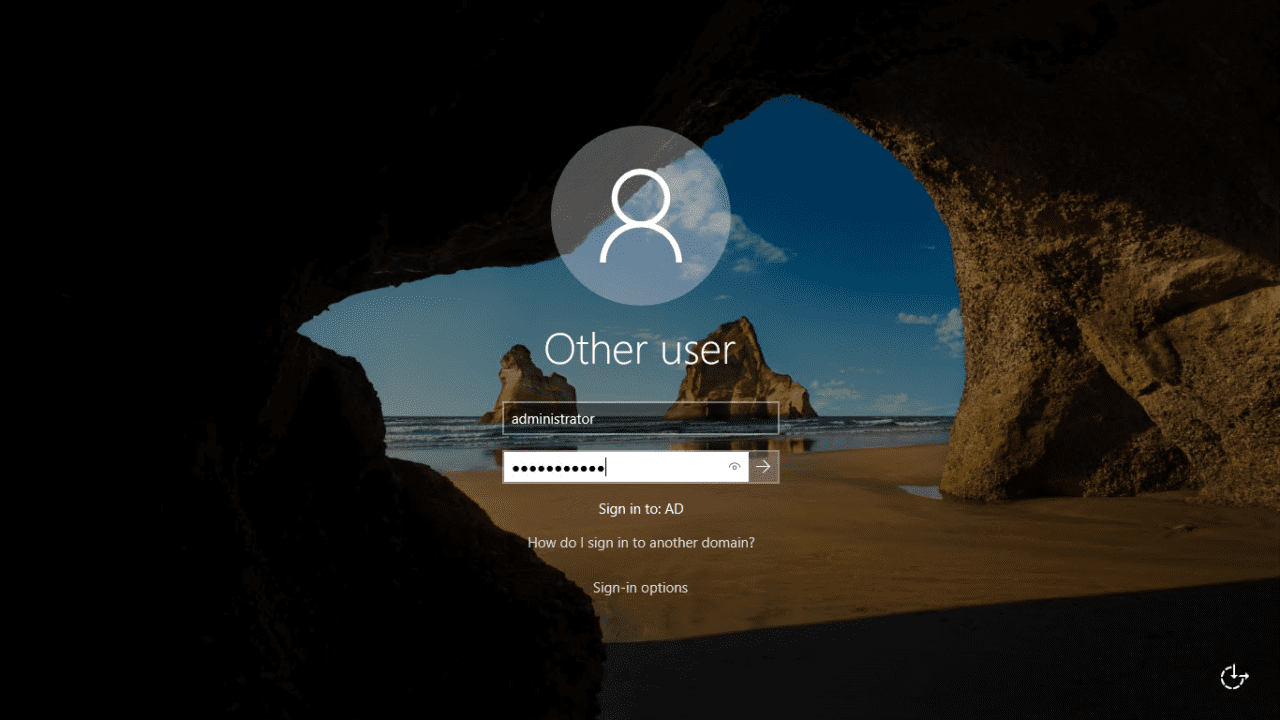
Once Windows Server has rebooted, you will need to log in with the domain administrator account. The domain administrator account is assigned the same password as the built-in administrator account.
- On the sign-in page, type administrator in the User name Type the password for the administrator account, which is the same as the password for the previous built-in administrator account, and press ENTER.
And that is it! You are now logged in to your AD domain’s first domain controller. In Server Manager, you can click the Tools menu and then select Active Directory Users and Computers to start managing your domain.