Syncthing
StepÉtape 1 – AddAjouter le dépôt Syncthing repoaux tosources apt
Tout d'abord, ajoutons le dépôt à notre base de données apt sourcespour
Firstly,nous let’sassurer addque thenous repositorypouvons totélécharger ourles aptpaquets databasedepuis tole ensuredépôt that we can download the packages from the repo:
:
echo "deb https://apt.syncthing.net/ syncthing stable" | sudo tee /etc/apt/sources.list.d/syncthing.list

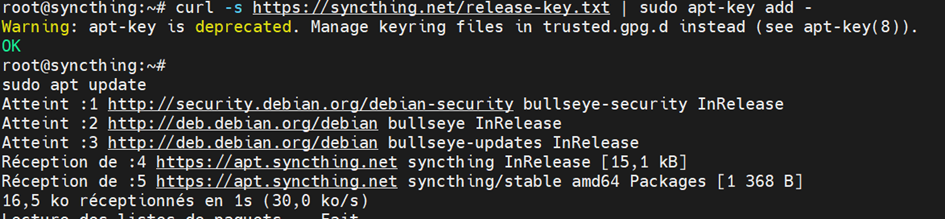
StepÉtape 2 – AddAjouter Syncthing’sles clés PGP keysde Syncthing
Next,Ensuite, wenous willallons addajouter thela clé PGP du dépôt Syncthing repository’sà PGPnos key to ourclés apt keysen usingutilisant thela followingcommande command:suivante :
curl -s https://syncthing.net/release-key.txt | sudo apt-key add
StepÉtape 3 – UpdateMettre apt’sà databasejour la base de données d'apt
ThenEnsuite, wenous useutilisons thela commande apt commandpour tomettre updateà thejour repositoriesles sodépôts weafin cande getpouvoir theobtenir latestles packagesderniers andpaquets dependencies:et dépendances :
sudo apt update

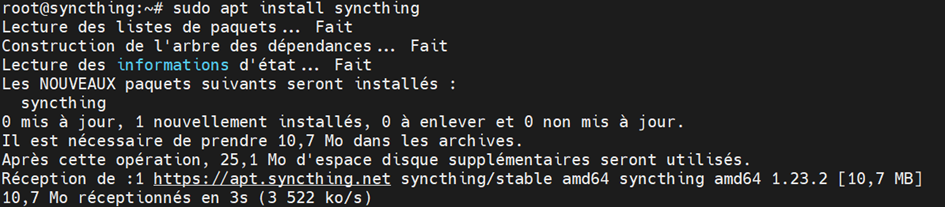
StepÉtape 4 – InstallInstaller Syncthing
OnceUne wefois areque donenous withavons allterminé thetoutes stepsles above,étapes weci-dessus, cannous finallypouvons goenfin aheadprocéder andà installl'installation de Syncthing. ForPour thatcela, runexécutez thela commandcommande :
sudo apt install syncthing
StepÉtape 5 – EnableActiver thele service Syncthing service
ToPour enableactiver syncthingSyncthing, typetapez thela followingcommande commandsuivante replacingen remplaçant username withpar yourvotre actualnom username:d'utilisateur réel :
sudo systemctl enable syncthing@root.service

NowMaintenant, startdémarrez the syncthingle service usingSyncthing theen utilisant la commande systemctl command::
sudo systemctl start syncthing@root.service

StepÉtape 6 Change– Modifier l'adresse IP address listeningd'écoute
syncthing -paths
cd .config/synthing
nano config.xml
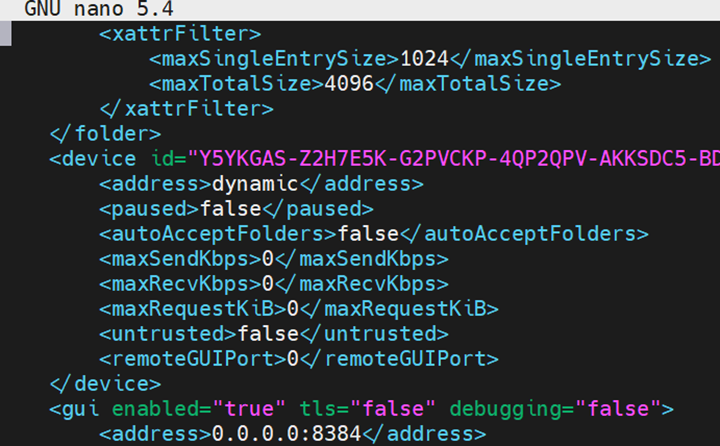
Changez l'adresse 0.0.0.0:8384 par celle que vous souhaitez.